This article shows how to implement authorization in an ASP.NET Core Blazor application using Azure AD security groups as the data source for the authorization definitions. Policies and claims are used in the application which decouples the descriptions from the Azure AD security groups and the application specific authorization requirements. With this setup, it is easy to support any complex authorization requirement and IT admins can manager the accounts independently in Azure. This solution will work for Azure AD B2C or can easily be adapted to use data from your database instead of Azure AD security groups if required.
Code: https://github.com/damienbod/AzureADAuthRazorUiServiceApiCertificate/tree/main/BlazorBff
Setup the AAD security groups
Before we start using the Azure AD security groups, the groups need to be created. I use Powershell to create the security groups. This is really simple using the Powershell AZ module with AD. For this demo, just two groups are created, one for users and one for admins. The script can be run from your Powershell console. You are required to authenticate before running the script and the groups are added if you have the rights. In DevOps, you could use a managed identity and the client credentials flow.
# https://theitbros.com/install-azure-powershell/
#
# https://docs.microsoft.com/en-us/powershell/module/az.accounts/connect-azaccount?view=azps-7.1.0
#
# Connect-AzAccount -Tenant "--tenantId--"
# AZ LOGIN --tenant "--tenantId--"

$tenantId = "--tenantId--"
$gpAdmins = "demo-admins"
$gpUsers = "demo-users"

function testParams {

	if (!$tenantId)
	{
		Write-Host "tenantId is null"
		exit 1
	}
}

testParams

function CreateGroup([string]$name) {
    Write-Host " - Create new group"
    $group = az ad group create --display-name $name --mail-nickname $name

    $gpObjectId = ($group | ConvertFrom-Json).objectId
    Write-Host " $gpObjectId $name"
}

Write-Host "Creating groups"

##################################
### Create groups
##################################

CreateGroup $gpAdmins
CreateGroup $gpUsers

#az ad group list --display-name $groupName

return
Once created, the new security groups should be visible in the Azure portal. You need to add group members or user members to the groups.

That’s all the configuration required to setup the security groups. Now the groups can be used in the applications.
Define the authorization policies
We do not use the security groups directly in the applications because this can change a lot or maybe the application is deployed to different host environments. The security groups are really just descriptions about the identity. How you use this, is application specific and depends on the solution business requirements which tend to change a lot. In the applications, shared authorization policies are defined and only used in the Blazor WASM and the Blazor server part. The definitions have nothing to do with the security groups, the groups get mapped to application claims. A Policies class definition was created for all the policies in the shared Blazor project because this is defined once, but used in the server project and the client project. The code was built based on the excellent blog from Chris Sainty. The claims definition for the authorization check have nothing to do with the Azure security groups, this logic is application specific and sometimes the applications need to apply different authorization logic how the security groups are used in different applications inside the same solution.
using Microsoft.AspNetCore.Authorization;

namespace BlazorAzureADWithApis.Shared.Authorization
{
    public static class Policies
    {
        public const string DemoAdminsIdentifier = "demo-admins";
        public const string DemoAdminsValue = "1";

        public const string DemoUsersIdentifier = "demo-users";
        public const string DemoUsersValue = "1";

        public static AuthorizationPolicy DemoAdminsPolicy()
        {
            return new AuthorizationPolicyBuilder()
                .RequireAuthenticatedUser()
                .RequireClaim(DemoAdminsIdentifier, DemoAdminsValue)
                .Build();
        }

        public static AuthorizationPolicy DemoUsersPolicy()
        {
            return new AuthorizationPolicyBuilder()
                .RequireAuthenticatedUser()
                .RequireClaim(DemoUsersIdentifier, DemoUsersValue)
                .Build();
        }
    }
}
Add the authorization to the WASM and the server project
The policy definitions can now be added to the Blazor Server project and the Blazor WASM project. The AddAuthorization extension method is used to add the authorization to the Blazor server. The policy names can be anything you want.
services.AddAuthorization(options =>
{
   // By default, all incoming requests will be authorized according to the default policy
   options.FallbackPolicy = options.DefaultPolicy;
   options.AddPolicy("DemoAdmins", Policies.DemoAdminsPolicy());
   options.AddPolicy("DemoUsers", Policies.DemoUsersPolicy());
});
The AddAuthorizationCore method is used to add the authorization policies to the Blazor WASM client project.
var builder = WebAssemblyHostBuilder.CreateDefault(args);
builder.Services.AddOptions();
builder.Services.AddAuthorizationCore(options =>
{
	options.AddPolicy("DemoAdmins", Policies.DemoAdminsPolicy());
	options.AddPolicy("DemoUsers", Policies.DemoUsersPolicy());
});
Now the application policies, claims are defined. Next job is to connect the Azure security definitions to the application authorization claims used for the authorization policies.
Link the security groups from Azure to the app authorization
This can be done using the IClaimsTransformation interface which gets called after a successful authentication. An application Microsoft Graph client is used to request the Azure AD security groups. The IDs of the Azure security groups are mapped to the application claims. Any logic can be added here which is application specific. If a hierarchical authorization system is required, this could be mapped here.
public class GraphApiClaimsTransformation : IClaimsTransformation
{
	private readonly MsGraphApplicationService _msGraphApplicationService;

	public GraphApiClaimsTransformation(MsGraphApplicationService msGraphApplicationService)
	{
		_msGraphApplicationService = msGraphApplicationService;
	}

	public async Task<ClaimsPrincipal> TransformAsync(ClaimsPrincipal principal)
	{
		ClaimsIdentity claimsIdentity = new();
		var groupClaimType = "group";
		if (!principal.HasClaim(claim => claim.Type == groupClaimType))
		{
			var objectidentifierClaimType = "http://schemas.microsoft.com/identity/claims/objectidentifier";
			var objectIdentifier = principal
				.Claims.FirstOrDefault(t => t.Type == objectidentifierClaimType);

			var groupIds = await _msGraphApplicationService
				.GetGraphUserMemberGroups(objectIdentifier.Value);

			foreach (var groupId in groupIds.ToList())
			{
				var claim = GetGroupClaim(groupId);
				if (claim != null) claimsIdentity.AddClaim(claim);
			}
		}

		principal.AddIdentity(claimsIdentity);
		return principal;
	}

    private Claim GetGroupClaim(string groupId)
	{
		Dictionary<string, Claim> mappings = new Dictionary<string, Claim>() {
			{ "1d9fba7e-b98a-45ec-b576-7ee77366cf10",
				new Claim(Policies.DemoUsersIdentifier, Policies.DemoUsersValue)},

			{ "be30f1dd-39c9-457b-ab22-55f5b67fb566",
				new Claim(Policies.DemoAdminsIdentifier, Policies.DemoAdminsValue)},
		};

		if (mappings.ContainsKey(groupId))
		{
			return mappings[groupId];
		}

		return null;
	}
}
The MsGraphApplicationService class is used to implement the Microsoft Graph requests. This uses application permissions with a ClientSecretCredential. I use secrets which are read from an Azure Key vault. You need to implement rotation for this or make it last forever and update the secrets in the DevOps builds every time you deploy. My secrets are only defined in Azure and used from the Azure Key Vault. You could use certificates but this adds no extra security unless you need to use the secret/certificate outside of Azure or in app settings somewhere. The GetMemberGroups method is used to get the groups for the authenticated user using the object identifier.
public class MsGraphApplicationService
{
	private readonly IConfiguration _configuration;

	public MsGraphApplicationService(IConfiguration configuration)
	{
		_configuration = configuration;
	}

	public async Task<IUserAppRoleAssignmentsCollectionPage>
		GetGraphUserAppRoles(string objectIdentifier)
	{
		var graphServiceClient = GetGraphClient();

		return await graphServiceClient.Users[objectIdentifier]
				.AppRoleAssignments
				.Request()
				.GetAsync();
	}

	public async Task<IDirectoryObjectGetMemberGroupsCollectionPage>
		GetGraphUserMemberGroups(string objectIdentifier)
	{
		var securityEnabledOnly = true;

		var graphServiceClient = GetGraphClient();

		return await graphServiceClient.Users[objectIdentifier]
			.GetMemberGroups(securityEnabledOnly)
			.Request().PostAsync();
	}

	private GraphServiceClient GetGraphClient()
	{
		string[] scopes = new[] { "https://graph.microsoft.com/.default" };
		var tenantId = _configuration["AzureAd:TenantId"];

		// Values from app registration
		var clientId = _configuration.GetValue<string>("AzureAd:ClientId");
		var clientSecret = _configuration.GetValue<string>("AzureAd:ClientSecret");

		var options = new TokenCredentialOptions
		{
			AuthorityHost = AzureAuthorityHosts.AzurePublicCloud
		};

		// https://docs.microsoft.com/dotnet/api/azure.identity.clientsecretcredential
		var clientSecretCredential = new ClientSecretCredential(
			tenantId, clientId, clientSecret, options);

		return new GraphServiceClient(clientSecretCredential, scopes);
	}
}
The security groups are mapped to the application claims and policies. The policies can be applied in the application.
Use the Policies in the Server
The Blazor server applications implements secure APIs for the Blazor WASM. The Authorize attribute is used with the policy definition. Now the user must be authorized using our definition to get data from this API. We also use cookies because the Blazor application is secured using the BFF architecture which has improved security compared to using tokens in the untrusted SPA.
[ValidateAntiForgeryToken]
[Authorize(Policy= "DemoAdmins",
	AuthenticationSchemes = CookieAuthenticationDefaults.AuthenticationScheme)]
[ApiController]
[Route("api/[controller]")]
public class DemoAdminController : ControllerBase
{
	[HttpGet]
	public IEnumerable<string> Get()
	{
		return new List<string>
		{
		  "admin data",
		  "secret admin record",
		  "loads of admin data"
		};
	}
}
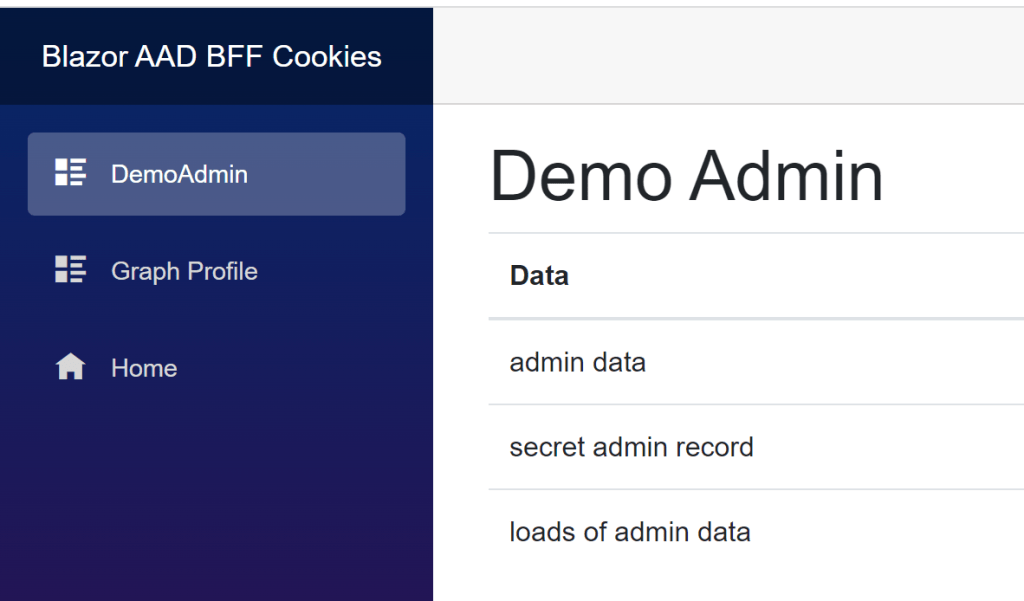
Use the policies in the WASM
The Blazor WASM application can also use the authorization policies. This is not really authorization but only usability because you cannot implement authorization in an untrusted application which you have no control of once it’s running. We would like to hide the components and menus which cannot be used, if you are not authorized. I use an AuthorizeView with a policy definition for this.
<div class="@NavMenuCssClass" @onclick="ToggleNavMenu">
    <ul class="nav flex-column">
        <AuthorizeView Policy="DemoAdmins">
            <Authorized>
                 <li class="nav-item px-3">
                    <NavLink class="nav-link" href="demoadmin">
                        <span class="oi oi-list-rich" aria-hidden="true"></span> DemoAdmin
                    </NavLink>
                </li>
            </Authorized>
        </AuthorizeView>

        <AuthorizeView Policy="DemoUsers">
            <Authorized>
                 <li class="nav-item px-3">
                    <NavLink class="nav-link" href="demouser">
                        <span class="oi oi-list-rich" aria-hidden="true"></span> DemoUser
                    </NavLink>
                </li>
            </Authorized>
        </AuthorizeView>

        <AuthorizeView>
            <Authorized>
                <li class="nav-item px-3">
                    <NavLink class="nav-link" href="graphprofile">
                        <span class="oi oi-list-rich" aria-hidden="true"></span> Graph Profile
                    </NavLink>
                </li>
                <li class="nav-item px-3">
                    <NavLink class="nav-link" href="" Match="NavLinkMatch.All">
                        <span class="oi oi-home" aria-hidden="true"></span> Home
                    </NavLink>
                </li>
            </Authorized>
            <NotAuthorized>
                <li class="nav-item px-3">
                    <p style="color:white">Please sign in</p>
                </li>
            </NotAuthorized>
        </AuthorizeView>

    </ul>
</div>
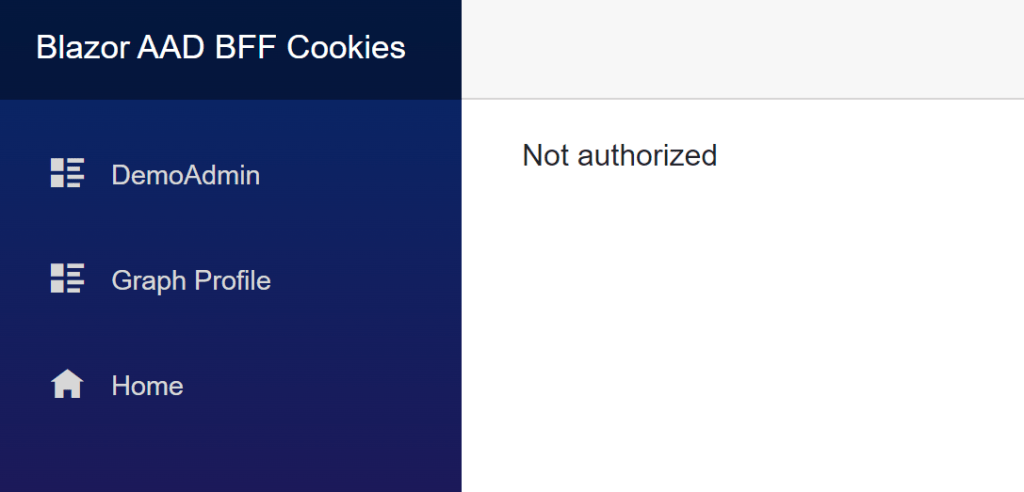
The Blazor UI pages should also use an Authorize attribute. This prevents an unhandled exception. You could add logic which forces you to login then with the permissions required or just display an error page. This depends on the UI strategy.
@page "/demoadmin"
@using Microsoft.AspNetCore.Authorization
@inject IHttpClientFactory HttpClientFactory
@inject IJSRuntime JSRuntime
@attribute [Authorize(Policy ="DemoAdmins")]

<h1>Demo Admin</h1>
When the application is started, you will only see what you allowed to see and more important, only be able to get data for what you are authorized.
If you open a page where you have no access rights:
Notes:
This solution is very flexible and can work with any source of identity definitions, not just Azure security groups. I could very easily switch to a database. One problem with this, is that with a lot of authorization definitions, the size of the cookie might get to big and you would need to switch from using claims in the policies definitions to using a cache database or something. This would also be easy to adapt because the claims are only mapped in the policies and the IClaimsTransformation implementation. Only the policies are used in the application logic.
Links
https://docs.microsoft.com/en-us/aspnet/core/blazor/security


[…] Implementing authorization in Blazor ASP.NET Core applications using Azure AD security groups [#.NET Core #ASP.NET Core #Azure #Azure AD #OAuth2 #Security #aad #Authorization #Blazor #groups] […]
[…] Implementing authorization in Blazor ASP.NET Core applications using Azure AD security groups (Damien Bowden) […]
[…] Implementing authorization in Blazor ASP.NET Core applications using Azure AD security groups – Damien Bowden […]
Am I missing something? GraphApiClaimsTransformation and MsGraphApplicationService are never actually used anywhere.