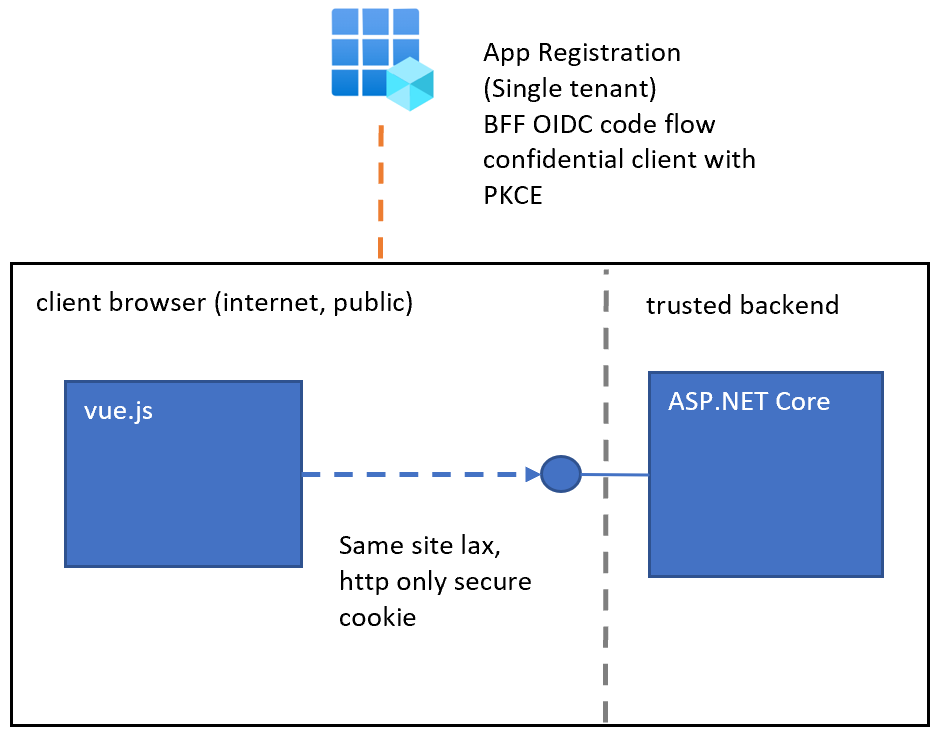
This article shows how to implement a secure web application using Vue.js and ASP.NET Core. The web application implements the backend for frontend security architecture (BFF) and deploys both technical stack distributions as one web application. HTTP only secure cookies are used to persist the session. Microsoft Entra ID is used as the identity provider and the token issuer.
Code: https://github.com/damienbod/bff-aspnetcore-vuejs
Overview
The solution is deployed as a single OpenID Connect confidential client using the Microsoft Entra ID identity provider. The OpenID Connect client authenticates using the code flow with PKCE and a secret or a certificate. I use secrets in development and certificates in production deployments. The UI part of the solution is deployed as part of the server application. Secure HTTP only cookies are used to persist the session after a successful authentication. No security flows are implemented in the client part of the application. No sensitive data like tokens are exposed in the client browser. By removing the security from the client, the security is improved and the complexity is reduced.
Setup Vue.js application
The Vue.js UI is setup so that the default development environment is used like in any Vue.js standalone application. A reverse proxy is used to integrate the application into the secure backend development environment. The UI uses Vue.js 3 with Typescript and Vite.
HTTPS setup and Production build
The production build is used to add the application as a UI view in the server rendered application, in this case ASP.NET Core. I always use HTTPS in development, so that the errors are discovered early and a strong CSP can also be used. This is all setup in the vite project file.
import { defineConfig } from 'vite'
import vue from '@vitejs/plugin-vue'
import fs from 'fs';

// https://vitejs.dev/config/
export default defineConfig({
  plugins: [vue()],
  server: {
    https: {
		key: fs.readFileSync('./certs/dev_localhost.key'),
		cert: fs.readFileSync('./certs/dev_localhost.pem'),
	},
    port: 4202,
    strictPort: true, // exit if port is in use
    hmr: {
      clientPort: 4202,
    },
  },
  optimizeDeps: {
    force: true,
  },
  build: {
    outDir: "../server/wwwroot",
    emptyOutDir: true
  },
})
CSP setup
The CSP is setup to use nonces both in development and production. This will save time fixing CSP issues before you go live. Vue.js creates scripts and styles on a build or a npm dev (vite). The scripts require the nonce. The styles require a nonce in production. To add the server created nonce, the index.html file uses a meta tag in the header as well as the server rendered middleware parsing for scripts and styles. The nonce gets added and updated with a new value on every HTTP response. This can be used directly in the Vue.js code. When adding further script statically or dynamically, the nonce placeholder can be used. This gets updated dynamically in development and production environments.
<!doctype html>
<html lang="en">
  <head>
    <meta charset="UTF-8" />
	<meta name="CSP_NONCE" content="**PLACEHOLDER_NONCE_SERVER**" />
    <link rel="icon" type="image/svg+xml" href="/vite.svg" />
    <meta name="viewport" content="width=device-width, initial-scale=1.0" />
    <title>Vite + Vue + TS</title>
  </head>
  <body>
    <div id="app"></div>
    /src/main.ts
  </body>
</html>
The ASP.NET Core _host file is used to serve up the index.html and adds in the dynamic bits to the Vue.js application. The scripts and styles have a nonce applied in production and the scripts in the development environment. Added and replace the CSP nonce can be done in different ways and needs to match the Vue.js index.html. This can change, depending on the setup of the Vue.js index.html.
@page "/"
@namespace BlazorBffAzureAD.Pages
@using System.Net;
@using NetEscapades.AspNetCore.SecurityHeaders;
@addTagHelper *, Microsoft.AspNetCore.Mvc.TagHelpers
@addTagHelper *, NetEscapades.AspNetCore.SecurityHeaders.TagHelpers
@inject IHostEnvironment hostEnvironment
@inject IConfiguration config
@inject Microsoft.AspNetCore.Antiforgery.IAntiforgery antiForgery
@{
    Layout = null;

    var source = "";
    if (hostEnvironment.IsDevelopment())
    {
        var httpClient = new HttpClient();
        source = await httpClient.GetStringAsync($"{config["UiDevServerUrl"]}/index.html");
    }
    else
    {
        source = System.IO.File.ReadAllText($"{System.IO.Directory.GetCurrentDirectory()}{@"/wwwroot/index.html"}");
    }

    var nonce = HttpContext.GetNonce();

    // The nonce is passed to the client through the HTML to avoid sync issues between tabs
    source = source.Replace("**PLACEHOLDER_NONCE_SERVER**", nonce);

    var nonceScript = $"<script nonce=\"{nonce}\" type=";
    source = source.Replace("<script type=", nonceScript);

    // link rel="stylesheet"
    var nonceLinkStyle = $"<link nonce=\"{nonce}\" rel=\"stylesheet";
    source = source.Replace("<link rel=\"stylesheet", nonceLinkStyle);

    var xsrf = antiForgery.GetAndStoreTokens(HttpContext);
    var requestToken = xsrf.RequestToken;

    // The XSRF-Tokens are passed to the client through cookies, since we always want the most up-to-date cookies across all tabs
    Response.Cookies.Append("XSRF-RequestToken", requestToken ?? "", new CookieOptions() { HttpOnly = false, IsEssential = true, Secure = true, SameSite = SameSiteMode.Strict });
}

@Html.Raw(source)
Anti-forgery protection
Cookies are used to store the session authentication. The authentication cookie is a HTTP only secure cookie only for its domain. Browser Same Site protection helps secure the session. Old browsers do not support Same Site and Anti-forgery protection is still required. You can add this protection in two ways. I use a CSRF anti-forgery cookie. You could also use custom headers with validation. The getCookie script gets the anti-forgery cookie which was created by the server. This cookie is not HTTP only because it needs to be read into the UI.
export const getCookie = (cookieName: string) => {
  const name = `${cookieName}=`;
  const decodedCookie = decodeURIComponent(document.cookie);
  const ca = decodedCookie.split(";");
  for (let i = 0; i < ca.length; i += 1) {
    let c = ca[i];
    while (c.charAt(0) === " ") {
      c = c.substring(1);
    }
    if (c.indexOf(name) === 0) {
      return c.substring(name.length, c.length);
    }
  }
  return "";
};
The Anti-forgery header is added to every API call which requires this. I use axios to request API data, and the header needs to be added to the axiosConfig. For the demo, I just implemented this directly the Vue js component. The component makes various API calls.
<script setup lang="ts">
import ResultsDisplay from './ResultsDisplay.vue'
import axios from 'axios';
import { ref, onMounted } from 'vue'
import { getCookie } from '../getCookie';

const isLoggedIn = ref<boolean>()
const currentUser = ref<any>()
const jsonResponse = ref<any>()

onMounted(() => {
  getUserProfile()
})

const axiosConfig = {
  headers:{
    'X-XSRF-TOKEN': getCookie('XSRF-RequestToken'),
  }
};

// request.headers.set('X-XSRF-TOKEN',  getCookie('XSRF-RequestToken'));

function getDirectApi() {
	axios.get(`${getCurrentHost()}/api/DirectApi`, axiosConfig)
		.then((response: any) => {
			jsonResponse.value =  response.data;
			return response.data;
		})
		.catch((error: any) => {
			alert(error);
		});
}

function getUserProfile() {
	axios.get(`${getCurrentHost()}/api/User`)
	.then((response: any) => {
		console.log(response);
		jsonResponse.value  =  response.data;
		if(response.data.isAuthenticated){
			isLoggedIn.value  = true;
			currentUser.value  = response.data.claims[0].value
		}

		return response.data;
	})
	.catch((error: any) => {
		alert(error);
	});
}

function getGraphApiDataUsingApi() {
	axios.get(`${getCurrentHost()}/api/GraphApiData`, axiosConfig)
		.then((response: any) => {
			jsonResponse.value  =  response.data;
			return response.data;
		})
		.catch((error: any) => {
			alert(error);
	});
}

function getCurrentHost() {
	const host = window.location.host;
	const url = `${window.location.protocol}//${host}`;

	return url;
}

</script>

<template>
  <div class='home'>

	<a class="btn" href="api/Account/Login" v-if='!isLoggedIn'>Log in</a>

	<div v-if='isLoggedIn'>
		<form method="post" action="api/Account/Logout">
		  <button class="btn btn-link" type="submit">Sign out</button>
		</form>

	</div>

	<button v-if='isLoggedIn' class='btn' @click='getUserProfile' >Get Profile data</button>
	<button v-if='isLoggedIn' class='btn' @click='getDirectApi' >Get API data</button>
	<button v-if='isLoggedIn' class='btn' @click='getGraphApiDataUsingApi' >Get Graph data</button>

	<ResultsDisplay v-if='isLoggedIn'
		v-bind:currentUser='currentUser'
		v-bind:jsonResponse='jsonResponse' />

  </div>

  <p class="read-the-docs">BFF using ASP.NET Core and Vue.js</p>
</template>

<style scoped>
.read-the-docs {
  color: #888;
}
</style>
Setup ASP.NET Core application
The ASP.NET Core project is setup to host the static html file from Vue.js and respond to all HTTP requests as defined using the APIs. The nonce is added to the index.html file. Microsoft.Identity.Web is used to authenticate the user and the application. The session is stored in a cookie. The NetEscapades.AspNetCore.SecurityHeaders Nuget package is used to add the security headers and the CSP.
using BffMicrosoftEntraID.Server;
using BffMicrosoftEntraID.Server.Services;
using Microsoft.AspNetCore.Authentication.Cookies;
using Microsoft.AspNetCore.Mvc;
using Microsoft.Identity.Web;
using Microsoft.Identity.Web.UI;
using Microsoft.IdentityModel.Logging;

var builder = WebApplication.CreateBuilder(args);

builder.WebHost.ConfigureKestrel(serverOptions =>
{
    serverOptions.AddServerHeader = false;
});

var services = builder.Services;
var configuration = builder.Configuration;
var env = builder.Environment;

services.AddScoped<MsGraphService>();
services.AddScoped<CaeClaimsChallengeService>();

services.AddAntiforgery(options =>
{
    options.HeaderName = "X-XSRF-TOKEN";
    options.Cookie.Name = "__Host-X-XSRF-TOKEN";
    options.Cookie.SameSite = SameSiteMode.Strict;
    options.Cookie.SecurePolicy = CookieSecurePolicy.Always;
});

services.AddHttpClient();
services.AddOptions();

var scopes = configuration.GetValue<string>("DownstreamApi:Scopes");
string[] initialScopes = scopes!.Split(' ');

services.AddMicrosoftIdentityWebAppAuthentication(configuration, "MicrosoftEntraID")
    .EnableTokenAcquisitionToCallDownstreamApi(initialScopes)
    .AddMicrosoftGraph("https://graph.microsoft.com/v1.0", initialScopes)
    .AddInMemoryTokenCaches();

// If using downstream APIs and in memory cache, you need to reset the cookie session if the cache is missing
// If you use persistent cache, you do not require this.
// You can also return the 403 with the required scopes, this needs special handling for ajax calls
// The check is only for single scopes
services.Configure<CookieAuthenticationOptions>(CookieAuthenticationDefaults.AuthenticationScheme,
    options =>  options.Events = new RejectSessionCookieWhenAccountNotInCacheEvents(initialScopes));

services.AddControllersWithViews(options =>
    options.Filters.Add(new AutoValidateAntiforgeryTokenAttribute()));

services.AddRazorPages().AddMvcOptions(options =>
{
    //var policy = new AuthorizationPolicyBuilder()
    //    .RequireAuthenticatedUser()
    //    .Build();
    //options.Filters.Add(new AuthorizeFilter(policy));
}).AddMicrosoftIdentityUI();

builder.Services.AddReverseProxy()
   .LoadFromConfig(builder.Configuration.GetSection("ReverseProxy"));

var app = builder.Build();

IdentityModelEventSource.ShowPII = true;

if (env.IsDevelopment())
{
    app.UseDeveloperExceptionPage();
    app.UseWebAssemblyDebugging();
}
else
{
    app.UseExceptionHandler("/Error");
}

app.UseSecurityHeaders(
    SecurityHeadersDefinitions.GetHeaderPolicyCollection(env.IsDevelopment(),
        configuration["MicrosoftEntraID:Instance"]));

app.UseHttpsRedirection();

app.UseStaticFiles();

app.UseRouting();

app.UseNoUnauthorizedRedirect("/api");

app.UseAuthentication();
app.UseAuthorization();

app.MapRazorPages();
app.MapControllers();
app.MapNotFound("/api/{**segment}");

if (app.Environment.IsDevelopment())
{
    var uiDevServer = app.Configuration.GetValue<string>("UiDevServerUrl");
    if (!string.IsNullOrEmpty(uiDevServer))
    {
        app.MapReverseProxy();
    }
}

app.MapFallbackToPage("/_Host");

app.Run();
Setup Azure App registration
The application is deployed as one. The application consists of two parts, the Vue.js part and the ASP.NET Core part. These are tightly coupled (business) even if the technical stacks are not. This is an OpenID Connect confidential client with a user secret or a certification for client assertion.
Use the Web client type on setup.

Development environment
Developers require a professional development setup and should use the technical stacks like the creators of the tech stacks recommend. Default development environments is the aim and always the easiest to maintain. The Vue.js project uses a default vite environment or best practices as the Vue.js community recommends. The server part of the application must proxy all UI requests to the Vue.js development environment. I use Microsoft YARP reverse proxy to implement this. This is only required for development in this setup. Some flavors of the BFF use proxies int eh production environments as well.

Testing and running
The appsettings.json MUST be updated with your Azure tenant Azure App registration values. If using a client secret, store this in the user secrets for development, or in a key vault when deployed to Azure.
  "MicrosoftEntraID": {
    "Instance": "https://login.microsoftonline.com/",
    "Domain": "[Enter the domain of your tenant, e.g. contoso.onmicrosoft.com]",
    "TenantId": "[Enter 'common', or 'organizations' or the Tenant Id (Obtained from the Azure portal. Select 'Endpoints' from the 'App registrations' blade and use the GUID in any of the URLs), e.g. da41245a5-11b3-996c-00a8-4d99re19f292]",
    "ClientId": "[Enter the Client Id (Application ID obtained from the Azure portal), e.g. ba74781c2-53c2-442a-97c2-3d60re42f403]",
    "ClientSecret": "[Copy the client secret added to the app from the Azure portal]",
    "ClientCertificates": [
    ],
    // the following is required to handle Continuous Access Evaluation challenges
    "ClientCapabilities": [ "cp1" ],
    "CallbackPath": "/signin-oidc"
  },
Debugging
Start the Vue.js project from the ui folder
npm start
Start the ASP.NET Core project from the server folder
dotnet run
When the localhost of the server app is opened, you can authenticate and use.
Notes
I was not able to apply the nonce to the dev environment styles of the Vue.js part. This would be of great benefit as you can prevent insecure styles in development and not discover these problems after a deployment. In the production build, the nonce is applied correctly.
Links:
https://github.com/vuejs/create-vue
https://learn.microsoft.com/en-us/aspnet/core/introduction-to-aspnet-core
https://github.com/AzureAD/microsoft-identity-web
https://www.koderhq.com/tutorial/vue/vite/
https://github.com/isolutionsag/aspnet-react-bff-proxy-example
https://github.com/damienbod/bff-aspnetcore-angular
https://github.com/damienbod/bff-auth0-aspnetcore-angular
https://github.com/damienbod/bff-openiddict-aspnetcore-angular


[…] Implement a secure web application using Vue.js and an ASP.NET Core server (Damien Bowden) […]