This post shows how an ASP.NET Core API can authorize API calls which use different access tokens from different identity providers or different access tokens from the same identity provider but created for different clients and containing different claims. The access tokens are validated using JWT Bearer authentication as well as an authorization policy which can validate the specific claims in the access tokens.
Code: https://github.com/damienbod/ApiJwtWithTwoSts
History
2022-12-20 Updated default scheme definition
2022-12-18 Updated to .NET 7
The Services are configured to add the authentication services using the AddAuthentication method. Two schemes are added, one for each access token. JWT Bearer tokens are used and the Authority and the Audience properties are used to define the auth. If introspection is used, you would define a secret here as well and use an introspection client..
services.AddAuthentication(options =>
{
	options.DefaultScheme = "SchemeStsA";
})
.AddJwtBearer("SchemeStsA", options =>
{
	options.Audience = "rs_scope_aApi";
	options.Authority = "https://localhost:44318";
	options.TokenValidationParameters = new TokenValidationParameters
	{
		ValidateIssuer = true,
		ValidateAudience = true,
		ValidateIssuerSigningKey = true,
		ValidAudiences = new List<string> { "rs_scope_aApi" },
		ValidIssuers = new List<string> { "https://localhost:44318"},
	};

})
.AddJwtBearer("SchemeStsB", options =>
{
	options.Audience = "rs_scope_bApi";
	options.Authority = "https://localhost:44367";
	options.TokenValidationParameters = new TokenValidationParameters
	{
		ValidateIssuer = true,
		ValidateAudience = true,
		ValidateIssuerSigningKey = true,
		ValidAudiences = new List<string> { "rs_scope_bApi" },
		ValidIssuers = new List<string> { "https://localhost:44367" },
	};
});
The MyApiHandler is added as a service. This provides a way to fulfil the MyApiRequirement which is used in the policy MyPolicy.
services.AddAuthorization(options =>
{
	options.DefaultPolicy = new AuthorizationPolicyBuilder()
		.RequireAuthenticatedUser()
		.AddAuthenticationSchemes("SchemeStsA", "SchemeStsB")
		.Build();

	options.AddPolicy("MyPolicy", policy =>
	{
		policy.AddRequirements(new MyApiRequirement());
	});
});
Swagger services are added with support for JWT Bearer to make it easier to test.
services.AddSwaggerGen(c =>
{
	// add JWT Authentication
	var securityScheme = new OpenApiSecurityScheme
	{
		Name = "JWT Authentication",
		Description = "Enter JWT Bearer token **_only_**",
		In = ParameterLocation.Header,
		Type = SecuritySchemeType.Http,
		Scheme = "bearer", // must be lower case
		BearerFormat = "JWT",
		Reference = new OpenApiReference
		{
			Id = JwtBearerDefaults.AuthenticationScheme,
			Type = ReferenceType.SecurityScheme
		}
	};
	c.AddSecurityDefinition(securityScheme.Reference.Id, securityScheme);
	c.AddSecurityRequirement(new OpenApiSecurityRequirement
	{
		{securityScheme, Array.Empty<string>()}
	});

	c.SwaggerDoc("v1", new OpenApiInfo
	{
		Title = "An API ",
		Version = "v1",
		Description = "An API",
		Contact = new OpenApiContact
		{
			Name = "damienbod",
			Email = string.Empty,
			Url = new Uri("https://damienbod.com/"),
		},
	});
});
The middleware is setup to use the services and adds the support for Swagger with the JWT Bearer auth UI and the standard middleware setup like the templates.
app.UseSwagger();
app.UseSwaggerUI(c =>
{
	c.SwaggerEndpoint("/swagger/v1/swagger.json", "Service API One");
	c.RoutePrefix = string.Empty;
});

app.UseStaticFiles();
app.UseRouting();
app.UseAuthentication();
app.UseAuthorization();

app.UseEndpoints(endpoints =>
{
	endpoints.MapControllers();
});
A new class MyApiRequirement was created which implements the IAuthorizationRequirement interface.
public class MyApiRequirement : IAuthorizationRequirement
The MyApiHandler implements the AuthorizationHandler with the requirement MyApiRequirement. This is used to implement the logic to fulfil the requirement MyApiRequirement. In this demo, depending on the client_id claim in the access token, a different scope is required to fulfil the requirement. Any logic can be used here depending on your business requirements
using Microsoft.AspNetCore.Authorization;
using System.Security.Claims;

namespace WebApi;

public class MyApiHandler : AuthorizationHandler<MyApiRequirement>
{
    protected override Task HandleRequirementAsync(AuthorizationHandlerContext context, MyApiRequirement requirement)
    {
        if (context == null)
            throw new ArgumentNullException(nameof(context));
        if (requirement == null)
            throw new ArgumentNullException(nameof(requirement));

        var client_id = context.User.Claims.FirstOrDefault(t => t.Type == "client_id");
        var scope = context.User.Claims.FirstOrDefault(t => t.Type == "scope");

        if (AccessTokenValid(client_id, scope))
        {
            context.Succeed(requirement);
        }

        return Task.CompletedTask;
    }

    private bool AccessTokenValid(Claim? client_id, Claim? scope)
    {
        if (client_id != null && client_id.Value == "CC_STS_A")
        {
            return StsAScopeAValid(scope);
        }

        if (client_id != null && client_id.Value == "CC_STS_B")
        {
            return StsBScopeBValid(scope);
        }

        return false;
    }

    private static bool StsAScopeAValid(Claim? scope)
    {
        if (scope != null && scope.Value == "scope_a")
        {
            return true;
        }

        return false;
    }

    private static bool StsBScopeBValid(Claim? scope)
    {
        if (scope != null && scope.Value == "scope_b")
        {
            return true;
        }

        return false;
    }
}
The policy and the authentication schemes can be used in ASP.NET Core controllers. Every Authorize attribute must succeed, if access is given to the request with the access token calling the API. This is why the single policy was used to implement the different authorization rules for the different access tokens. If this was more complex, it would make sense to have a single controller for each access token type. The allowed schemes can be defined in a comma separated string.
using Microsoft.AspNetCore.Authorization;
using Microsoft.AspNetCore.Mvc;

namespace WebApi.Controllers;

[Route("api/[controller]")]
public class ValuesController : Controller
{
    [Authorize(AuthenticationSchemes = "SchemeStsA,SchemeStsB", Policy = "MyPolicy")]
    [HttpGet]
    public IEnumerable<string> Get()
    {
        return new string[] { "data 1 from the api", "data 2 from the api" };
    }
}
Getting an access token
In the example, IdentityServer4 is used as the identity provider and the client credential flow is used to get an access token for the APP to APP access. The trusted client uses a shared secret to get the token. OAuth have some RFCs which can improve this and avoid the use of a shared secrets or if all applications are under your control, you could use Azure Key Vault to share the secret which is auto generate in an Azure DevOps pipeline.
private async Task<AccessTokenItem> GetApiTokenInternal(string api_name, string api_scope, string secret)
{
	try
	{
		var disco = await HttpClientDiscoveryExtensions.GetDiscoveryDocumentAsync(
			_httpClient,
			_authConfigurations.Value.StsServer);

		if (disco.IsError)
		{
			_logger.LogError("disco error Status code: {discoIsError}, Error: {discoError}", disco.IsError, disco.Error);
			throw new ApplicationException($"Status code: {disco.IsError}, Error: {disco.Error}");
		}

		var tokenResponse = await HttpClientTokenRequestExtensions.RequestClientCredentialsTokenAsync(_httpClient, new ClientCredentialsTokenRequest
		{
			Scope = api_scope,
			ClientSecret = secret,
			Address = disco.TokenEndpoint,
			ClientId = api_name
		});

		if (tokenResponse.IsError)
		{
			_logger.LogError("tokenResponse.IsError Status code: {tokenResponseIsError}, Error: {tokenResponseError}", tokenResponse.IsError, tokenResponse.Error);
			throw new ApplicationException($"Status code: {tokenResponse.IsError}, Error: {tokenResponse.Error}");
		}

		return new AccessTokenItem
		{
			ExpiresIn = DateTime.UtcNow.AddSeconds(tokenResponse.ExpiresIn),
			AccessToken = tokenResponse.AccessToken
		};

	}
	catch (Exception e)
	{
		_logger.LogError("Exception {e}", e);
		throw new ApplicationException($"Exception {e}");
	}
}
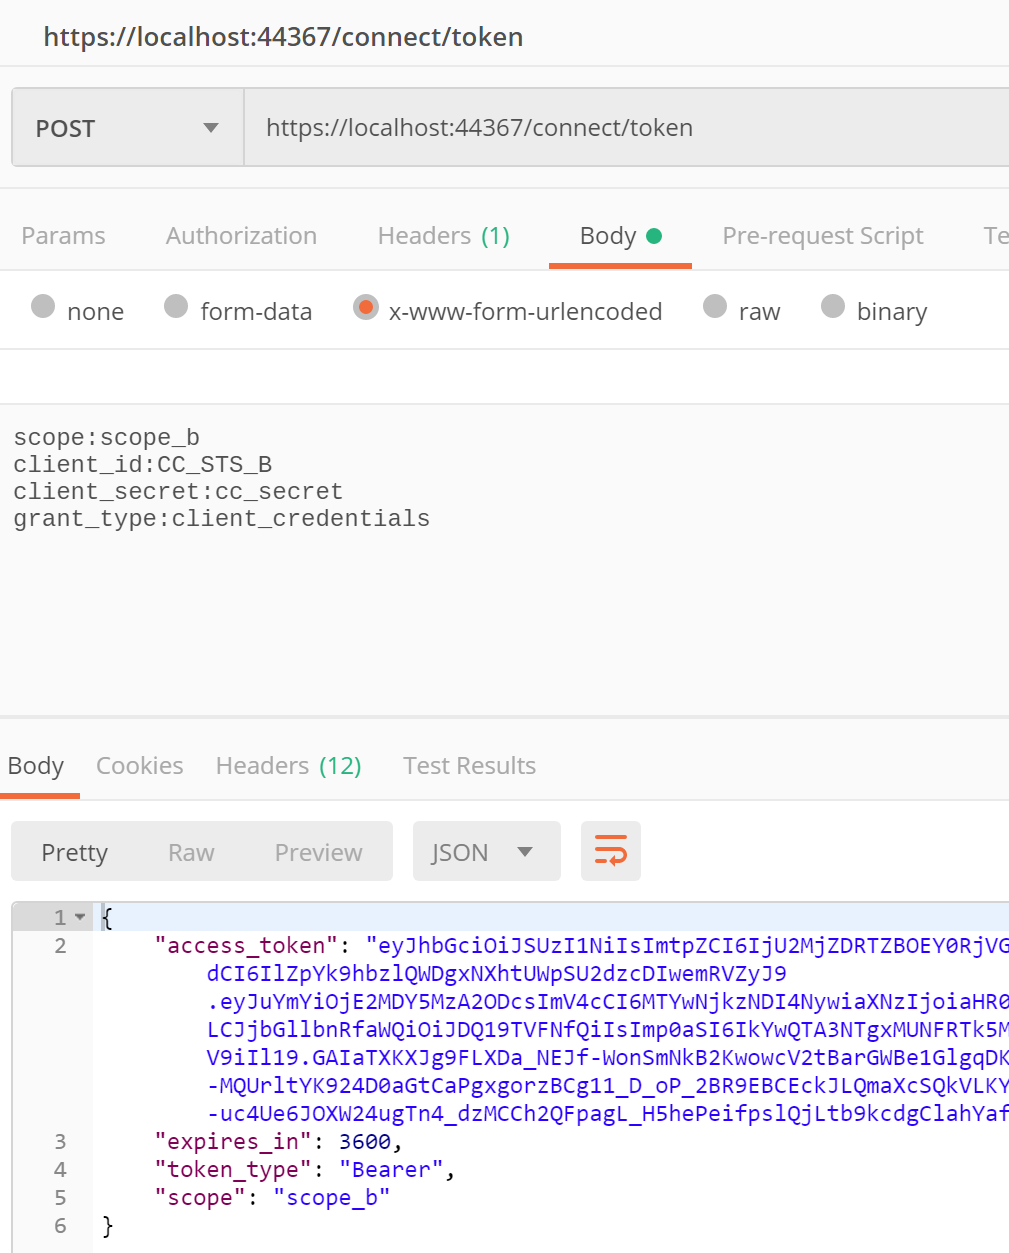
Using Postman
Postman can also be used to get an access token for this OAuth client credentials flow.
POST https://localhost:44367/connect/token

scope:scope_b
client_id:CC_STS_B
client_secret:cc_secret
grant_type:client_credentials
This uses the parameters like shown above.
Calling the payload API
The access token can be used to access the payload data. This can be added directly to your Swagger client.

And the request will be sent and the data can returned

The access token can also be used in C# code to request the data.
public async Task<List<string>?> GetApiDataAsync()
{
	try
	{
		var client = _clientFactory.CreateClient();

		client.BaseAddress = new Uri(_authConfigurations.Value.ProtectedApiUrl);

		var access_token = await _apiTokenClient.GetApiToken(
			"CC_STS_B",
			"scope_b",
			"cc_secret"
		);

		client.SetBearerToken(access_token);

		var response = await client.GetAsync("api/values");
		if (response.IsSuccessStatusCode)
		{
			//var responseContent = await response.Content.ReadAsStringAsync();
			var data = await JsonSerializer.DeserializeAsync<List<string>>(
				response.Content.ReadAsStream());

			return data;
		}

		throw new ApplicationException($"Status code: {response.StatusCode}, Error: {response.ReasonPhrase}");
	}
	catch (Exception e)
	{
		throw new ApplicationException($"Exception {e}");
	}
}
Links
https://docs.microsoft.com/en-us/aspnet/core/security/authorization/introduction


[…] Securing an ASP.NET Core API which uses multiple access tokens (Damien Bowden) […]
[…] Securing an ASP.NET Core API which uses multiple access tokens – Damien Bowden […]
[Authorize(AuthenticationSchemes = “… above the controller indicates which schemes are supported. Without it authentication does not work. So without Authorization-attribute, authentication does not work.
Hi Robert, this for your comment, authentication is used
https://github.com/damienbod/ApiJwtWithTwoSts/blob/main/RazorPageOidcClient/Startup.cs#L90-L91
https://github.com/damienbod/ApiJwtWithTwoSts/blob/main/WebApi/Startup.cs#L156-L157
You don’t need an authorization attribute if you force this globally as well.
Greetings Damien
Hi, when I try this code for AddAuthentication/AddJwtBearer I get “No authenticationScheme was specified, and there was no DefaultChallengeScheme found”. Any idea why? Thanks
I defined the scheme on the controller:
https://github.com/damienbod/ApiJwtWithTwoSts/blob/main/WebApi/Controllers/ValuesController.cs
Hi Paul what .NET do you use? You might need to set the default scheme in the setup, or force your specific scheme in the controller where you use it.
I don’t have this error, which part of the project gives you this error?
Greetings Damien
I should really define a handler for the default scheme
Here are some docs:
https://learn.microsoft.com/en-us/aspnet/core/security/authentication/?view=aspnetcore-7.0
Updated the code to add a handler for the default scheme
after adding multiple AddJwtBearer, I have now the issue described here: https://oliviervaillancourt.com/posts/Fixing-IDX10501-MultipleAuthScheme
what do you think about Olivier’s solution?
I don’t have this problem, last time I checked. I will validate. Thanks for the link, I’ll read it, greetings Damien