This article shows how to use an Azure Key Vault with an ASP.NET Core application deployed as an Azure App Service. The Azure App Service can use the system assigned identity to access the Key Vault. This needs to be configured in the Key Vault access policies using the service principal.
Code: https://github.com/damienbod/AspNetCoreBackChannelLogout
Posts in this series:
- OpenID Connect back-channel logout using Azure Redis Cache and IdentityServer4
- Using Azure Key Vault with ASP.NET Core and Azure App Services
- Deploying ASP.NET Core App Services using Azure Key Vault and Azure Resource Manager templates
- Using Azure Key Vault from a non-Azure App
Create an Azure Key Vault
This is really easy, and does not require much effort. You can create an Azure Key Vault by following the Microsoft documentation here:
https://docs.microsoft.com/en-us/azure/key-vault/key-vault-get-started
Or using the Azure UI, you can create a Key Vault by clicking the “+ Create a Resource” blade and typing Key Vault in the search text input.

Fill out the inputs as required.
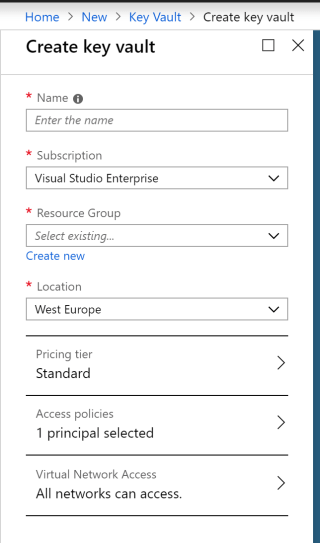
Now the Key Vault should be ready.
Create and Deploy the Azure App service
The second step is to deploy the ASP.NET Core application to Azure as an Azure App Service. You can do this in Visual Studio, or with templates from a build. Once the application is deployed, check that the Identity blade is configured correctly.
In the “App Services” blade, click the application which was deployed, and then the Identity blade. The Status must be “On” for the system assigned tab.

See the Microsoft docs for Azure App Services deployments.
Add the Access Policy in the Key Vault for the App Service
Now that the Azure App Service is ready, the Key Vault must be configured to permit the App Service application access. In the Key Vault, click the “Access Policies” blade, and then “Add new”
Then click the “Select principal” and search for the Azure App service which was created above. Make sure that the required permissions are activated when configuring. Normally only the GET and List permissions are required. Click save, and check that the permissions are really saved after you have saved.

Now the Azure App Service can access the Key Vault.
Add some secrets to the Key Vault:

The secrets can be added in different formats. See the Microsoft docs for secret text formats. Any app.settings.json format can be matched.
Configure the application to use the Key Vault for configuration values
The application now requires code to use the Azure Key Vault. Add the Microsoft.Extensions.Configuration.AzureKeyVault NuGet package to the project.

Add the Azure Key Vault configuration to the Program.cs file in the ASP.NET Core application. Add this in the BuildWebHost method using the ConfigureAppConfiguration method. The app.settings configuration value AzureKeyVaultEndpoint should have the DNS Name value of the Key Vault. This can be found in the overview of the Key Vault which was created. Then add the Key Vault to the application as follows:
public static IWebHost BuildWebHost(string[] args) =>
 WebHost.CreateDefaultBuilder(args)
 .ConfigureAppConfiguration((context, config) =>
 {
    var builder = config.Build();

    var keyVaultEndpoint = builder["AzureKeyVaultEndpoint"];

    var azureServiceTokenProvider = new AzureServiceTokenProvider();

    var keyVaultClient = new KeyVaultClient(
      new KeyVaultClient.AuthenticationCallback(
        azureServiceTokenProvider.KeyVaultTokenCallback)
      );

    config.AddAzureKeyVault(keyVaultEndpoint);
 })
 .UseStartup<Startup>()
Remove any Configuration builders from the Startup constructor. The IConfiguration should be used, not created here.
public IConfiguration Configuration { get; }

public Startup(IConfiguration configuration, IHostingEnvironment env)
{
	JwtSecurityTokenHandler.DefaultInboundClaimTypeMap.Clear();
	Configuration = configuration;
	_environment = env;
}
Add the Key Vault developer values, to the app.settings as required, or add the secret values for development to the secrets.json file.
{
  "ConnectionStrings": {
    "RedisCacheConnection": "redis-connection-string"
  },
  "Logging": {
    "IncludeScopes": false,
    "LogLevel": {
      "Default": "Debug",
      "System": "Information",
      "Microsoft": "Information"
    }
  },
  "AuthConfiguration": {
    "StsServerIdentityUrl": "https://localhost:44318",
    "Audience": "mvc.hybrid.backchannel"
  },
  "SecretMvcHybridBackChannel": "secret"
}
The configuration values will be set from the Key Vault first. If no Key Vault item exists, then the secrets.json file will be used, and after this, the app.settings.json file.
The Key Vault values can be used anywhere in the ASP.NET Core application by using the standard configuration interfaces.
The following demo uses the Test configuration value which is read from the Key Vault.
private AuthConfiguration _optionsAuthConfiguration;

private IConfiguration _configuration;

public HomeController(IOptions<AuthConfiguration> optionsAuthConfiguration, IConfiguration configuration)
{
	_configuration = configuration;
	_optionsAuthConfiguration = optionsAuthConfiguration.Value;
}

public IActionResult Index()
{
	var cs = _configuration["Test"];
	return View("Index",  cs);
}
Links
https://docs.microsoft.com/en-us/azure/key-vault/key-vault-developers-guide
Using the Azure Key Vault to keep secrets out of your web app’s source code
https://stackoverflow.com/questions/40025598/azure-key-vault-access-denied
https://cmatskas.com/securing-asp-net-core-application-settings-using-azure-key-vault/
https://github.com/jayendranarumugam/DemoSecrets/tree/master/DemoSecrets
https://docs.microsoft.com/en-us/cli/azure/install-azure-cli-windows?view=azure-cli-latest


[…] Using Azure Key Vault with ASP.NET Core and Azure App Services (Damien Bowden) […]
Do we also need AzureActiveDirectory for this?
[…] Using Azure Key Vault with ASP.NET Core and Azure App Services: https://damienbod.com/2018/12/23/using-azure-key-vault-with-asp-net-core-and-azure-app-services/ […]
[…] Securing Azure Functions using an Azure Virtual Network Using Key Vault and Managed Identities with Azure Functions Using Azure Key Vault with ASP.NET Core and Azure App Services […]