This article shows how to onboard new users into your ASP.NET Core application using Azure B2C as the identity provider and the account management. The software has application specific persisted user data and this user data needs to be connected to the identity data from the corresponding user in Azure B2C.
Code: https://github.com/damienbod/azureb2c-fed-microsoft-entra-id
History
2024-01-02 Updated to .NET 8, Graph SDK 5
User Case where user is created first in the application
The users are created in the ASP.NET Core application from an administrator. Once the use is created, an email is sent to the new user. The user clicks the link in the application and signs up in Azure AD B2C. After the account has been created in Azure AD B2C, the user is redirected back to the application and the Azure B2C account gets connected to the persisted user in the database automatically persisting the Azure AD object identifier (oid) claim data. The account is activated in the application, the authorization definitions are created automatically and applied as defined by the administrator user in the first step.
It is not possible to onboard a new user in Azure B2C like this using Microsoft Graph without managing passwords. You should never mail passwords to users. For the flow to work, the signin signup user flow can be used from Azure B2C. The link sent to the user requires authentication and contains a registration one time code. When the user clicks the link, authentication is required and so the user is automatically redirected to Azure B2C. After a successfully signup, the user is redirected back to the application and the registration code is used to connect the accounts. At no stage did the application administrator need to manage the user passwords from the accounts. Because default Azure B2C flows are used, it should be easy to applied the latest best practices supported by Azure B2C for user authentication, once this gets rolled out. FIDO2 is not supported by Azure AD B2C which is bad as this is the strongest MFA.
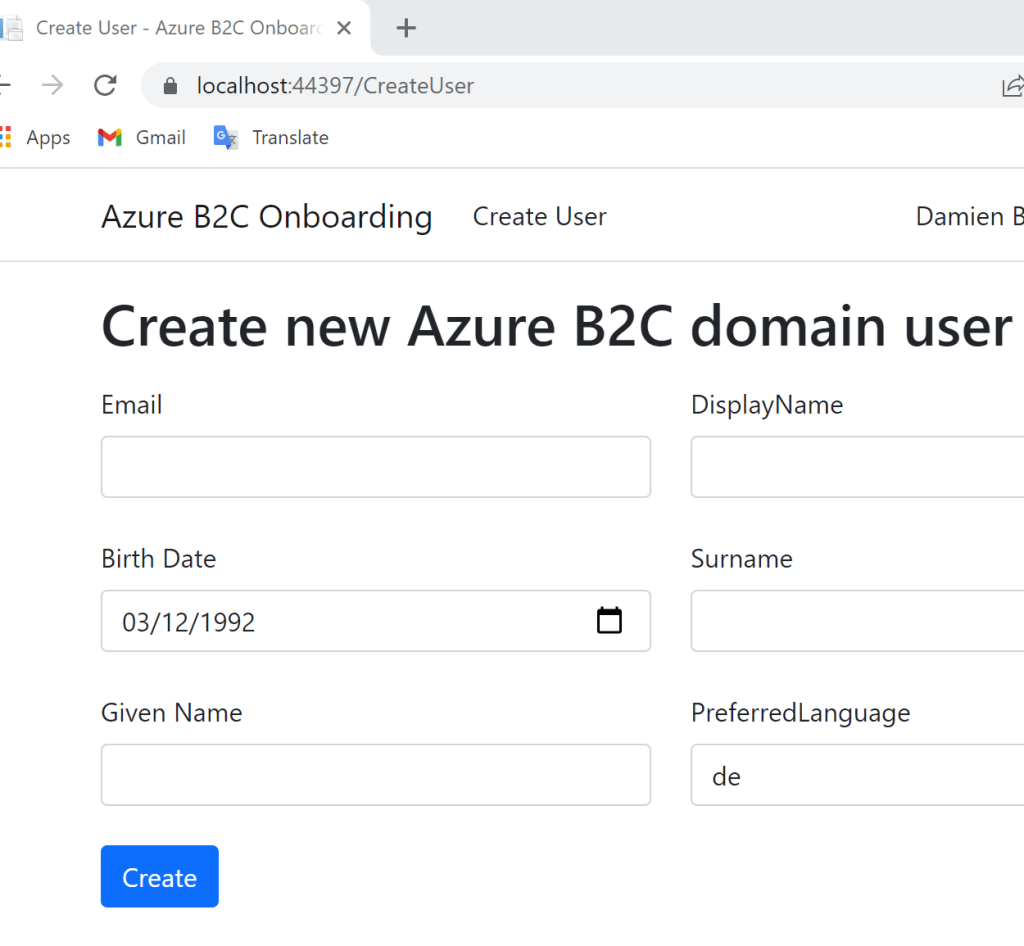
The create user can be implemented using an ASP.NET Core Razor page. This Razor page requires authentication and an admin policy. The form sends a post request with the user data and if valid, the data is saved to the database using Entity Framework Core. A random registration code is generated and persisted and saved in the user entity. An email is created and the ConnectAccount URL is used with the registration code. This URL is emailed to the end user using Microsoft Graph. An office license is required for the email client to work but you can use any email service. The user now exists and should have mail in their inbox. (or spam) If you are implementing this in a production application, you will need to implement a resend email function and I would update the registration code with each email.
public async Task<IActionResult> OnPostAsync()
{
	if (!ModelState.IsValid)
	{
		return Page();
	}

	if (!_userService.IsEmailValid(UserModel.Email))
	{
		ModelState.AddModelError("Email", "Email is invalid");
		return Page();
	}

	var user = await _userService.CreateUser(new UserEntity
	{
		Email = UserModel.Email,
		FirstName = UserModel.FirstName,
		Surname = UserModel.Surname,
		BirthDate = UserModel.BirthDate,
		DisplayName = UserModel.DisplayName,
		PreferredLanguage = UserModel.PreferredLanguage
	});

	await _userService.SendEmailInvite(user, Request.Host, false);

	OnboardingRegistrationCode = user.OnboardingRegistrationCode;
	return OnGet();
}
The SendEmailInvite method sends an email using the Microsoft Graph client.
public async Task SendEmailInvite(UserEntity user, HostString host, bool updateCode)
{
if (updateCode)
{
user.OnboardingRegistrationCode = GetRandomString();
await _userContext.SaveChangesAsync();
}
var accountUrl = $"https://{host}/ConnectAccount?code={user.OnboardingRegistrationCode}";
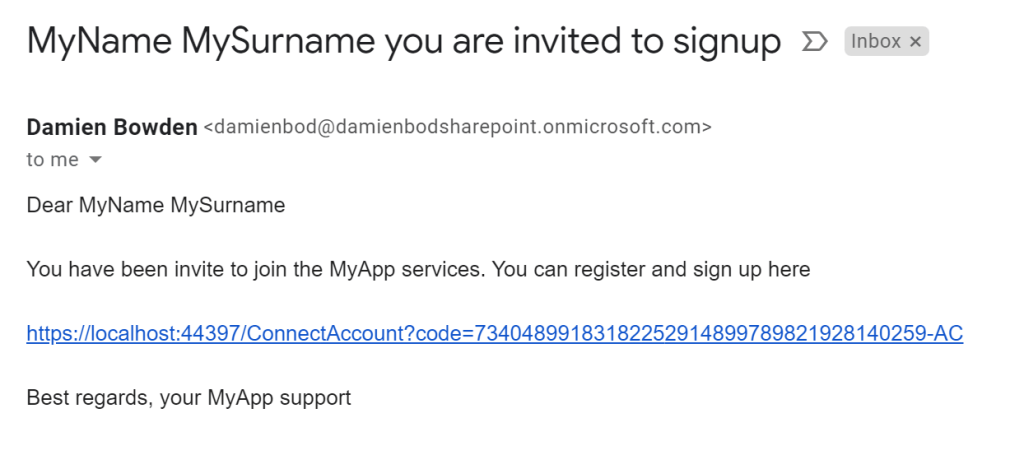
var header = $"{user.FirstName} {user.Surname} you are invited to signup";
var introText = "You have been invite to join the MyApp services. You can register and sign up here";
var endText = "Best regards, your MyApp support";
var body = $"Dear {user.FirstName} {user.Surname} \n\n{introText} \n\n{accountUrl} \n\n{endText}";
var message = _emailService.CreateStandardEmail(user.Email, header, body);
await _msGraphEmailService.SendEmailAsync(message);
}
The user service creates a user in the SQL database and generates the random code.
public async Task<UserEntity> CreateUser(UserEntity userModel)
{
	userModel.OnboardingRegistrationCode = GetRandomString();

	await _userContext.AddAsync(userModel);
	await _userContext.SaveChangesAsync();

	return userModel;
}
The create user ASP.NET Core Razor page just displays a simple form for adding the properties required by your business.
The MsGraphEmailService class implements the Microsoft Graph email service. This client needs to authorize using an Azure tenant which has an office license for the sender account. The application permissions also need to be enabled for the Azure App registration used. This works fine as long as you do not send loads of emails, the amount of mails you can send is limited and you do not want to send many emails anyway. The Azure SDK ClientSecretCredential is used which setups the client credentials flow and uses an application scope from the Azure App registration. For more details, see this post.
using Azure.Identity;
using Microsoft.Graph;
using Microsoft.Graph.Models;
using Microsoft.Graph.Users.Item.SendMail;

namespace OnboardingAzureB2CCustomInvite.Services;

public class MsGraphEmailService
{
    private readonly GraphServiceClient _graphServiceClient;
    private readonly IConfiguration _configuration;

    public MsGraphEmailService(IConfiguration configuration)
    {
        _configuration = configuration;
        string[]? scopes = configuration.GetValue<string>("AzureAdEmailService:Scopes")?.Split(' ');
        var tenantId = configuration.GetValue<string>("AzureAdEmailService:TenantId");

        // Values from app registration
        var clientId = configuration.GetValue<string>("AzureAdEmailService:ClientId");
        var clientSecret = configuration.GetValue<string>("AzureAdEmailService:ClientSecret");

        var options = new TokenCredentialOptions
        {
            AuthorityHost = AzureAuthorityHosts.AzurePublicCloud
        };

        // https://docs.microsoft.com/dotnet/api/azure.identity.clientsecretcredential
        var clientSecretCredential = new ClientSecretCredential(
            tenantId, clientId, clientSecret, options);

        _graphServiceClient = new GraphServiceClient(clientSecretCredential, scopes);
    }

    private async Task<string> GetUserIdAsync()
    {
        var meetingOrganizer = _configuration["AzureAdEmailService:EmailSender"];

        var filter = $"startswith(userPrincipalName,'{meetingOrganizer}')";

        var users = await _graphServiceClient.Users.GetAsync((requestConfiguration) =>
        {
            requestConfiguration.QueryParameters.Filter = filter;
        });

        var userId = users!.Value!.FirstOrDefault()!.Id;

        if (string.IsNullOrEmpty(userId))
        {
            return string.Empty;
        }

        return userId;
    }

    public async Task SendEmailAsync(Message message)
    {
        var saveToSentItems = true;
        var userId = await GetUserIdAsync();

        var body = new SendMailPostRequestBody
        {
            Message = message,
            SaveToSentItems = saveToSentItems
        };

        await _graphServiceClient.Users[userId]
            .SendMail
            .PostAsync(body);
    }
}
The email is sent as defined in the create user. The email is really simple and has the link to the ConnectAccount Razor page and the registration code. This is not a link direct to the Azure B2C signup as we want to automatically connect the user data from the application to the Azure B2C identity and assign the defined authorization. It is very easy to make a template for this email and translate it into the user language or add company information etc.
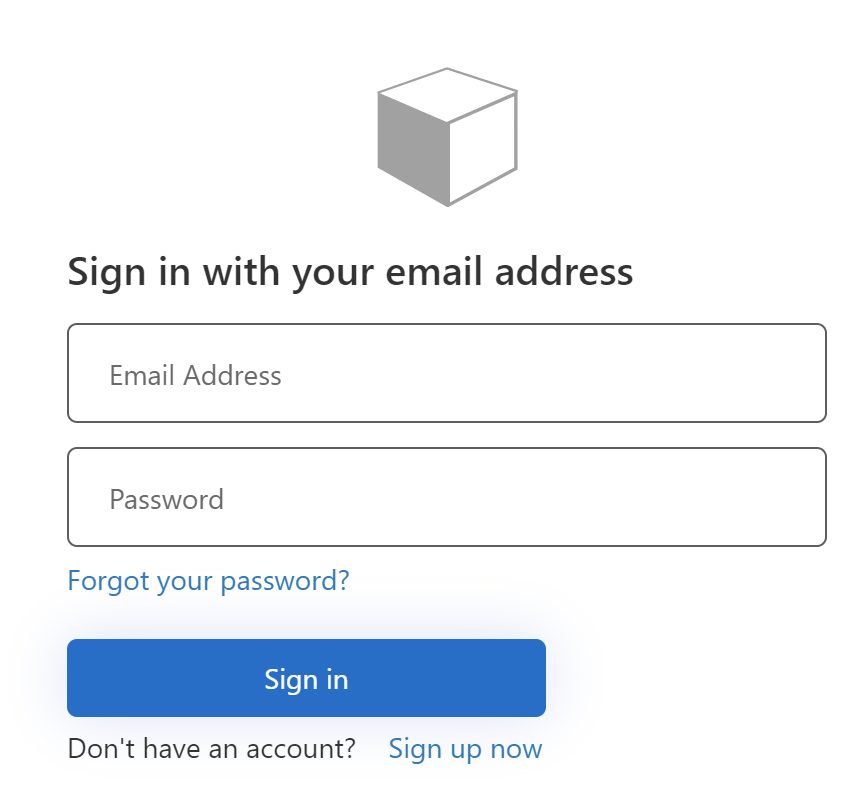
When the end user opens the email and clicks the link, the user opens the connect account link with the registration code. This URL requires authentication and is automatically redirected to the Azure B2C signin signup flow. We need to use this user flow, because in some cases the user already exists in Azure B2C and not in the application and this user would just signin then.
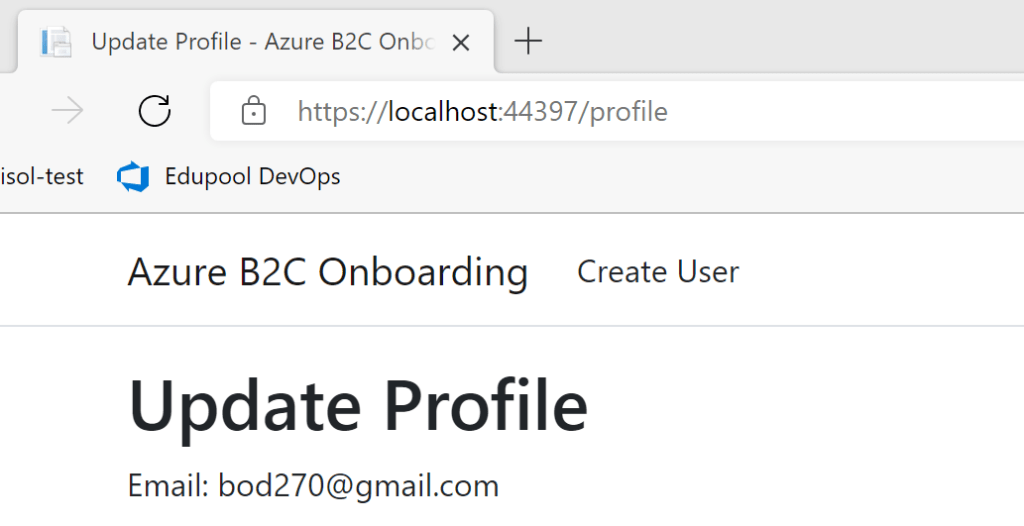
The ConnectAccount Razor page handles the GET requests and connects the authenticated identity with the user in the database if the registration code matches. Normally a GET should never change the state. This Razor page must be protected. If the registration code matches, the OID from the Azure B2C account is persisted and the registration code reset. The user account is set to active. If authorization is pre-defined for this user, then the authorization definitions can be created for the user as well. Once connected, the user can be redirected to the profile Razor page.
[Authorize]
public class ConnectAccountModel : PageModel
{
    private readonly UserService _userService;

    public ConnectAccountModel(UserService userService)
    {
        _userService = userService;
    }

    [BindProperty]
    public string? OnboardingRegistrationCode { get; set; } = string.Empty;

    public async Task<IActionResult> OnGet([FromQuery] string code)
    {
        if (string.IsNullOrEmpty(code))
        {
            return Page();
        }

        var email = User.Claims.FirstOrDefault(c => c.Type == "emails")?.Value;
        var oidClaimType = "http://schemas.microsoft.com/identity/claims/objectidentifier";
        var oid = User.Claims.FirstOrDefault(t => t.Type == oidClaimType)?.Value;

        if(oid == null)
            return Page();

        int id = await _userService.ConnectUserIfExistsAsync(
            code, oid, true, email);

        if(id > 0)
        {
            return Redirect("/profile");
        }

        return Page();
    }
The profile page allows the user to update data which is controlled by the user. I do this in the application and do not user the Azure B2C profile because this is application specific. This is sensitive data and needs to be handled correctly. I display the OID, IsActive and the email here, but this data must not be updated in the profile page. This user data can only be managed by an application administrator. I also create and new user profile for a user, if the user does not exist but already has an Azure B2C account. This account can signin but will see nothing as the identity has no authorization to view anything. The authorization is set by an application administrator. By allowed this, existing Azure B2C accounts can be onboarded as well.
[Authorize]
public class ProfileModel : PageModel
{
    private readonly UserService _userService;

    public ProfileModel(UserService userService)
    {
        _userService = userService;
    }

    [BindProperty]
    public Profile Profile { get; set; } = new Profile();

    [BindProperty]
    public string? AzureOid { get; set; } = string.Empty;

    [BindProperty]
    public bool IsActive { get; set; }

    [BindProperty]
    public string? Email { get; set; }


    public async Task<IActionResult> OnGetAsync()
    {
        var oidClaimType = "http://schemas.microsoft.com/identity/claims/objectidentifier";
        var oid = User.Claims.FirstOrDefault(t => t.Type == oidClaimType)?.Value;
        var email = User.Claims.FirstOrDefault(c => c.Type == "emails")?.Value;

        UserEntity? userEntity = null;
        if (oid != null)
        {
            userEntity = await _userService.FindUserWithOid(oid);

            if (userEntity != null)
            {
                Profile.Surname = userEntity.Surname;
                Profile.FirstName = userEntity.FirstName;
                Profile.DisplayName = userEntity.DisplayName;
                Profile.BirthDate  = userEntity.BirthDate;
                Profile.PreferredLanguage = userEntity.PreferredLanguage;

                IsActive = userEntity.IsActive;
                AzureOid = userEntity.AzureOid;
                Email = userEntity.Email;
            }
            else
            {
                IsActive = false;
                AzureOid = oid;
            }
        }

        return Page();
    }

    public async Task<IActionResult> OnPostAsync()
    {
        if (!ModelState.IsValid)
        {
            return Page();
        }

        var oidClaimType = "http://schemas.microsoft.com/identity/claims/objectidentifier";
        var oid = User.Claims.FirstOrDefault(t => t.Type == oidClaimType)?.Value;
        var email = User.Claims.FirstOrDefault(c => c.Type == "emails")?.Value;

        UserEntity? userEntity = null;
        if (oid != null)
            userEntity = await _userService.FindUserWithOid(oid);

        if(userEntity == null)
        {
            userEntity = new UserEntity();

            if (oid != null)
                userEntity.AzureOid = oid;
            if (email != null)
                userEntity.Email = email;
        }

        userEntity.FirstName = Profile.FirstName;
        userEntity.Surname = Profile.Surname;
        userEntity.BirthDate = Profile.BirthDate;
        userEntity.DisplayName = Profile.DisplayName;
        userEntity.PreferredLanguage = Profile.PreferredLanguage;

        await _userService.UpdateCreateProfile(userEntity);

        return await OnGetAsync();
    }
}
The Profile Razor page allows the user to update the profile data after authenticating using Azure B2C.
Notes
Onboarding and user registration in any software system needs to be robust and flexible. Because a separate identity provider is used, the application specific user data needs to be mapped to the identity profile data. The onboarding process needs to be flexible and user friendly. You also need to support account reset and account update processes, for example when a user changes email. Try to use a system which makes it easy to support, or force MFA for you users like FIDO2. At present, Azure B2C does not support strong MFA. It is not recommended to use SMS but even this is way better than only password.
Links
https://docs.microsoft.com/en-us/azure/active-directory-b2c/overview
https://docs.microsoft.com/en-us/azure/active-directory-b2c/identity-provider-azure-ad-single-tenant


[…] Onboarding new users in an ASP.NET Core application using Azure B2C – Damien Bowden […]
[…] Azure B2C users with Microsoft Graph and ASP.NET Core Onboarding new users in an ASP.NET Core application using Azure B2C Disable Azure AD user account using Microsoft Graph and an application client Invite […]