This article shows how to create certificates in .NET Core which can be used for Azure IoT Hub. The chained certificates are created using the nuget package CertificateManager.
Code: https://github.com/damienbod/AspNetCoreCertificates
To use X.509 security with Azure IoT Hub, we would like to create chained certificates. This would make it possible to separate devices or group them together using intermediate certificates and so on. In this example a self signed root certificate is created which can produce child certificates. The devices will be created from the child intermediate certificates. A cer file is exported from the certificate which can then be used in the IoT Hub setup. The pfx files can be uses to create new child certificates. You would need to persist these somewhere in a safe way.
Create chained certificates for Azure IoT Hub
var serviceProvider = new ServiceCollection()
	.AddCertificateManager()
	.BuildServiceProvider();

var spCerts = serviceProvider.GetService<CreateCertificatesClientServerAuth>();

var root = spCerts.NewRootCertificate(
	new DistinguishedName { CommonName = "root dev" },
	new ValidityPeriod { ValidFrom = DateTime.UtcNow,
		ValidTo = DateTime.UtcNow.AddYears(10) },
	3, "localhost");
root.FriendlyName = "developement root certificate";

var intermediate = spCerts.NewIntermediateChainedCertificate(
	new DistinguishedName { CommonName = "intermediate dev"},
	new ValidityPeriod { ValidFrom = DateTime.UtcNow,
		ValidTo = DateTime.UtcNow.AddYears(10) },
	2, "localhost", root);
intermediate.FriendlyName = "developement Intermediate certificate";

string password = "1234";
var iec = serviceProvider.GetService<ImportExportCertificate>();

var rootCertInPfxBtyes = iec.ExportRootPfx(password, root);
File.WriteAllBytes("root.pfx", rootCertInPfxBtyes);

var rootPublicKey = iec.ExportCertificatePublicKey(root);
var rootPublicKeyBytes = rootPublicKey.Export(X509ContentType.Cert);
File.WriteAllBytes($"root.cer", rootPublicKeyBytes);

var intermediateCertInPfxBtyes = iec.ExportChainedCertificatePfx(password, intermediate, root);
File.WriteAllBytes("intermediate.pfx", intermediateCertInPfxBtyes);
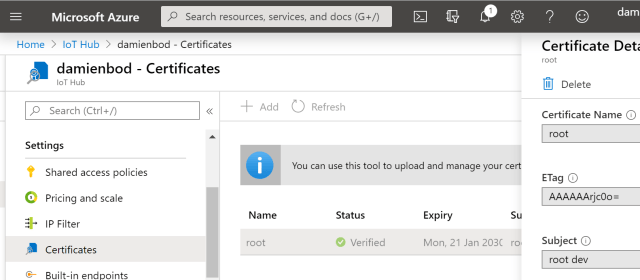
Create a verify certificate for Azure IoT Hub (.pem or .cer)
Once you upload the cer file to Azure IoT Hub, the certificate needs to be verified. To do this, you can create a pem export or a cer export of the certificate using the verify code from Azure IoT Hub. The root certificate from the previous code is used to create the verification certificate.
var serviceProvider = new ServiceCollection()
	.AddCertificateManager()
	.BuildServiceProvider();

var spCerts = serviceProvider.GetService<CreateCertificatesClientServerAuth>();

var iec = serviceProvider.GetService<ImportExportCertificate>();

var root = new X509Certificate2("root.pfx", "1234");

var deviceVerify = spCerts.NewDeviceVerificationCertificate(
"4C8C754C6DA4280DBAB7FC7BB320E7FFFB7F411CBB7EAA7D", root);
deviceVerify.FriendlyName = "device verify";

var deviceVerifyPEM = iec.PemExportPublicKeyCertificate(deviceVerify);
File.WriteAllText("deviceVerify.pem", deviceVerifyPEM);

var deviceVerifyPublicKey = iec.ExportCertificatePublicKey(deviceVerify);
var deviceVerifyPKyBytes = deviceVerifyPublicKey.Export(X509ContentType.Cert);
File.WriteAllBytes($"deviceVerify.cer", deviceVerifyPKBytes);
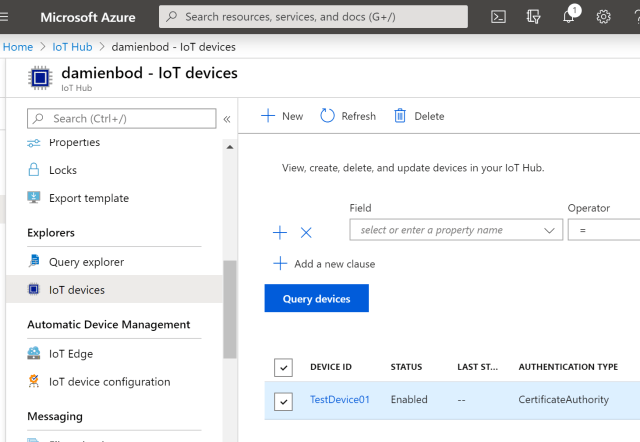
Create a device (Leaf) certificate for Azure IoT Hub device
For each device, a device certificate can be created from the required intermediate certificate. The device certificate CommonName must match the Device ID from Azure IoT Hub, which is defined when a new device is created in Azure. The distinguished name CommonName property is used to set the Subject and Issuer CN which is used on Azure IoT Hub as part of the certificate validation.
var serviceProvider = new ServiceCollection()
	.AddCertificateManager()
	.BuildServiceProvider();

var spCerts = serviceProvider.GetService<CreateCertificatesClientServerAuth>();

var intermediate = new X509Certificate2("intermediate.pfx", "1234");

var testDevice01 = spCerts.NewDeviceChainedCertificate(
	new DistinguishedName { CommonName = "TestDevice01" },
	new ValidityPeriod { ValidFrom = DateTime.UtcNow,
		ValidTo = DateTime.UtcNow.AddYears(10) },
	"localhost", intermediate);
testDevice01.FriendlyName = "IoT device testDevice01";

string password = "1234";
var iec = serviceProvider.GetService<ImportExportCertificate>();

var deviceInPfxBytes = iec.ExportChainedCertificatePfx(
	password,
	testDevice01,
	intermediate);
File.WriteAllBytes("testDevice01.pfx", deviceInPfxBytes);
Setup the Azure IoT Hub
The Azure IoT Hub can then be setup using the certificates and these docs:
https://docs.microsoft.com/en-us/azure/iot-hub/iot-hub-security-x509-get-started
Simulate an Azure IoT Device to test
Now that Azure IoT Hub is setup and ready to accept devices, you can test this with a simple device simulation. The following demo code was created using this Azure documentation.
The Microsoft.Azure.Devices.Client package is used to connect to the Hub.
<Project Sdk="Microsoft.NET.Sdk">

 <PropertyGroup>
  <OutputType>Exe</OutputType>
  <TargetFramework>netcoreapp3.1</TargetFramework>
 </PropertyGroup>

 <ItemGroup>
  <PackageReference Include="Microsoft.Azure.Devices.Client" Version="1.21.3" />
 </ItemGroup>

 <ItemGroup>
  <None Update="testDevice01.pfx">
     <CopyToOutputDirectory>PreserveNewest</CopyToOutputDirectory>
  </None>
 </ItemGroup>
</Project>
The simulator sends messages if the test application can connect to the Hub device. (Code from Azure docs)
We use the certificates created from above. The Device ID of the certificate and the device setup on Azure need to match.
using System;
using Microsoft.Azure.Devices.Client;
using Microsoft.Azure.Devices.Shared;
using System.Security.Cryptography.X509Certificates;
using System.Text;
using System.Threading.Tasks;

namespace SimulateAzureIoTDevice
{
    class Program
    {
        private static int MESSAGE_COUNT = 5;
        private const int TEMPERATURE_THRESHOLD = 30;
        private static String deviceId = "TestDevice01";
        private static float temperature;
        private static float humidity;
        private static Random rnd = new Random();

        static void Main(string[] args)
        {
            try
            {
                var cert = new X509Certificate2(@"testDevice01.pfx", "1234");
                var auth = new DeviceAuthenticationWithX509Certificate("TestDevice01", cert);
                var deviceClient = DeviceClient.Create("damienbod.azure-devices.net", auth, TransportType.Amqp_Tcp_Only);

                if (deviceClient == null)
                {
                    Console.WriteLine("Failed to create DeviceClient!");
                }
                else
                {
                    Console.WriteLine("Successfully created DeviceClient!");
                    SendEvent(deviceClient).Wait();
                }

                Console.WriteLine("Exiting...\n");
            }
            catch (Exception ex)
            {
                Console.WriteLine("Error in sample: {0}", ex.Message);
            }
        }

        static async Task SendEvent(DeviceClient deviceClient)
        {
            string dataBuffer;
            Console.WriteLine("Device sending {0} messages to IoTHub...\n", MESSAGE_COUNT);

            for (int count = 0; count < MESSAGE_COUNT; count++)
            {
                temperature = rnd.Next(20, 35);
                humidity = rnd.Next(60, 80);
                dataBuffer = string.Format("{{\"deviceId\":\"{0}\",\"messageId\":{1},\"temperature\":{2},\"humidity\":{3}}}", deviceId, count, temperature, humidity);
                Message eventMessage = new Message(Encoding.UTF8.GetBytes(dataBuffer));
                eventMessage.Properties.Add("temperatureAlert", (temperature > TEMPERATURE_THRESHOLD) ? "true" : "false");
                Console.WriteLine("\t{0}> Sending message: {1}, Data: [{2}]", DateTime.Now.ToLocalTime(), count, dataBuffer);

                await deviceClient.SendEventAsync(eventMessage);
            }
        }
    }
}
Now we have completely setup the certificates for Azure IoT Hub using .NET Core only code which can run on windows, Linux and Mac without scripts or other tools to create the certificates. The next step would be to automatic this process and persist the certificates in a safe way which can be managed.
Links:
https://docs.microsoft.com/en-us/azure/iot-hub/iot-hub-security-x509-get-started


[…] Creating Certificates for X.509 security in Azure IoT Hub using .NET Core (Damien Bowden) […]
[…] Creating Certificates for X.509 security in Azure IoT Hub using .NET Core – Damien Bowden […]
Very nice article. Would it also be possible to use this code for creating device identity certificates for DPS auto-provisioning?
Thank you. useful post.
[…] Creating Certificates for X.509 security in Azure IoT Hub using .NET Core — Software Engineering […]
[…] Creating Certificates for X.509 security in Azure IoT Hub using .NET Core […]
[…] some searching I stumbled across CREATING CERTIFICATES FOR X.509 SECURITY IN AZURE IOT HUB USING .NET CORE by Damien Bod which showed how to generate certificates for Azure IoT Hub solutions using his NuGet […]